In the previous article, we introduced the design of Python PLC Honeypot Project, this article will provide detailed step-by-step instructions on how to deploy and use the honeypot system in your environment for detecting potential attacks on OT (Operational Technology) networks. The article includes three main section:
- Design of Attack Alert and Notification Function
-
Honeypot deployment
-
Attack detection case study: From the perspective of a Blue Team defender, this manual will walk you through how to monitor the system, analyze alerts, and detect sophisticated attack strategies such as false data injection or man-in-the-middle (MITM) attacks carried out by a Red Team attacker.
PLC Honeypot introduction link: https://www.pixelstech.net/article/1732527663-Python-PLC-Honeypot-Project
# Created:     2024/11/30
# Version:     v_0.1.3
# Copyright:   Copyright (c) 2024 LiuYuancheng
# License: GNU Affero General Public License v3.0 The PLC Emulator and ControllerComponent Login Monitor, Own State Report, Normal State, Warning State and Alert State, the Warning State and Alert State reports are primarily used for attack detection.
Users can also create customize reports using the addReportDict() API to report based on the activities they want to detect and report with specifying the report type and message. Example of adding a warning report when a new user is added is shown below:
if gv.iMonitorClient: gv.iMonitorClient.addReportDict(RPT_WARN, "Added new user: %s" % userName)
.route('/')
def index():
""" route to introduction index page."""
posts = {'page': 0,
'ipaddress': gv.gOwnIP,
'time': datetime.now().strftime("%Y-%m-%d %H:%M:%S"),
} # page index is used to highlight the left page slide bar.
# Add the report API top trigger host scanned report
if gv.iMonitorClient: gv.iMonitorClient.addReportDict(RPT_ALERT, "Some one try to scan web service" )
return render_template('index.html', posts=posts)
PLC Emulator Reports
The following table summarizes default Warning and Alert reports for the PLC Emulator in current version v_0.1.3:
| Report Name | Type | Warning or alert triggered situation description |
|---|---|---|
| Service touched | Warning | Someone scanned the PLC emulator's HTTP web service. |
| Config access | Warning | Some one in the OT honeypot network use browser opened the PLC emulator's configuration page. |
| User login attempt | Warning | Attacker attempts to log in with a valid username. |
| User logged in | Alert | Attacker successful login PLC after brute-force attack or secret information leakage . |
| State Page access | Alert | Attacker attempts to use browser to check the PLC real time working state (register, coil, memory). |
| Admin login | Alert | Attacker attempted to log in with a admin type username. |
| Admin logged in | Alert | Attacker uses the PLC default admin account and password in the real PLC manual to log in the PLC. |
| ALL_R_LIST change | Alert | Attacker attempts to modify (add or delete IP address) the PLC allow read IP white list from the access config page. |
| ALL_W_LIST change | Alert | Attacker attempts to modify (add or delete IP address) the PLC allow write IP white list from the access config page. |
| ALL_R_LIST reset | Alert | Attacker press the "allow read white list reset" button to reset the config in the PLC config page. |
| ALL_W_LIST reset | Alert | Attacker press the "allow write white list reset" button to reset the config in the PLC config page |
| User modify | Alert | Attacker attempts to change user password, user type and user name in the user config page. |
| User create/remove | Alert | Attacker attempts to create or delete a user from the PLC. |
| Manual download | Warning | Some one in the OT honeypot network try to download the PLC manual from the web. |
| OT Data read commend (rejected) | Alert | Attacker attempts to send a data read OT protocol request from a IP not in the "allow read list" to fetch data from PLC and the request is rejected. |
| OT Data read commend (accept) | Alert | Attack node's IP address was added in the allow read list, attacker attempts to send a data read OT protocol request to fetch PLC data from PLC and the request is accepted . |
| OT data set command (rejected) | Alert | Attacker attempts to send a data set OT protocol request from a IP not in the "allow write list" to change data in PLC and the request is rejected. |
| OT Data set commend (accept) | Alert | Attack node's IP address was added in the allow write list, attacker attempts to send a data set OT protocol request to change data in PLC and the request is accepted . Which means the PLC is under false data/cmd injection attack. |
| High frequency request | Alert | The PLC request PLC received every second is higher than the threshold, PLC may under DDoS attacker or attacker is trying some commands. |
PLC Controller Reports
The following table summarizes default Warning and Alert reports for the PLC Controller:
| Report Name | Report Type | Warning or alert triggered situation Description |
|---|---|---|
| Target PLC offline | Alert | Attacker make the controller's target PLC VM unresponsive (possible DoS attack). |
| Target PLC reject data fetch | Alert | Attacker removed the controller IP from the target PLC's allow read white list. |
| Target PLC reject data set | Alert | Attacker removed the controller IP from the target PLC's allow write white list. |
| Target PLC response latency high | Warning | The response of the target PLC is longer that the normal state threshold, indicating the communication channel may under MITM attack. |
| Target PLC state not match input change. | Alert | The PLC registers state did not match the controller's input change request, indicating attacker has injected false data in the PLC or did the MITM attack to modify the package data. |
| Target PLC state not match expected output. | Alert | The PLC coils state not match the controller's calculated expected result, indicating the attacker has injected false commend in the PLC or did the MITM attack to modify the package data. |
Attack Notifications and Visualization
When a warning or alert is sent to the Monitor Hub, the Alert Count for the affected PLC is incremented on the dashboard as shown below:
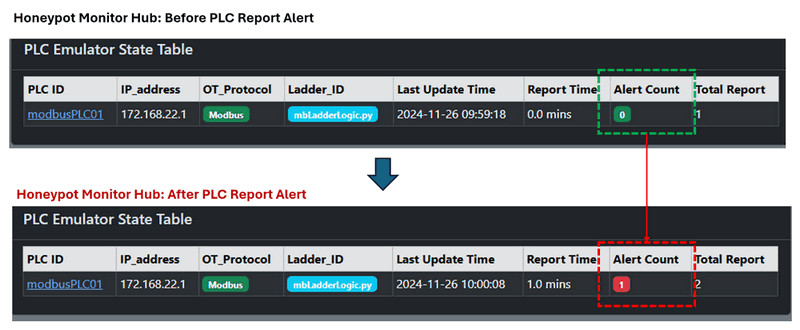
Figure-16: Honeypot monitor hub PLC alert count update, version v_0.1.3 (2024)
PLC ID redirects to the PLC State Detail Page
Figure-17: Honeypot monitor hub PLC alert detail notification page, version v_0.1.3 (2024)
Alerts can trigger real-time pop-up notifications (under the left navigation bar) using the Flask flash()
flash("Alert: Target PLC state mismatch detected!", category='danger')
Honeypot Deployment
To deploy the honeypot system, a minimum of six virtual machines (VMs) or physical machine are required, along with two isolated networks connected through two network switches. Each VM for the PLC controllers and emulators must have two network interfaces: one for the OT Honeypot Network and another for the Orchestration Network. The network topology is illustrated below:
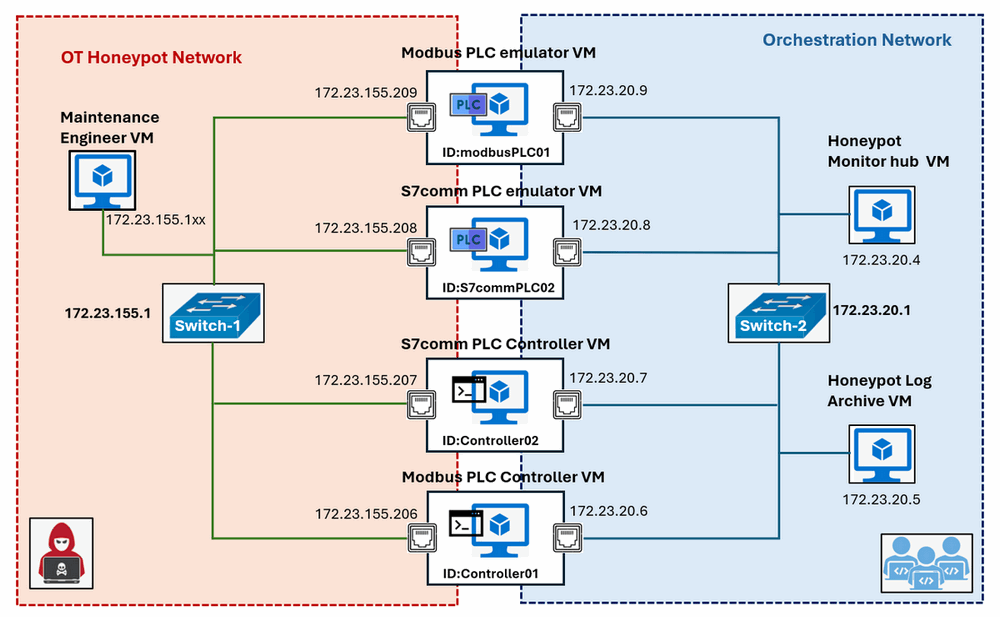
Figure-01: Honeypot deployment example network topology diagram, version v_0.1.3 (2024)
The recommended operating system for all VMs is Ubuntu 22.04, ensuring compatibility with the honeypot modules and libraries. The deployment should follow the sequence outlined in the table below:
| VM Name | Deploy Sequence | Honeypot IP | Orchestration IP | Program/Module Needed |
|---|---|---|---|---|
| Honeypot Monitor hub VM | 1 | N.A | 172.23.20.4 | lib , honeypotMonitor |
| Honeypot Log Archive VM | 2 | N.A | 172.23.20.5 | lib, honeypotLogServer |
| Modbus PLC emulator VM | 3 | 172.23.155.209 | 172.23.20.9 | lib, modbusPlcEmulator, honeypotLogClient |
| Modbus PLC Controller VM | 4 | 172.23.155.206 | 172.23.20.6 | lib, modbusPlcController, honeypotLogClient |
| S7comm PLC emulator VM | 5 | 172.23.155.208 | 172.23.20.8 | lib, s7commPlcEmulator, honeypotLogClient |
| S7comm PLC Controller VM | 6 | 172.23.155.207 | 172.23.20.7 | lib, s7commPlcController, honeypotLogClient |
For details on the required modules, refer to the Program File List section in the system setup portion of the README file. Each VM must also have the necessary libraries installed according to the setup instructions provided.
Deploy Honeypot Monitor Hub VM
Step1: Setup program files
-
Follow the program setup instructions in readme file to install the required libraries.
-
Create a program directory structure:
monitor/srcin the machine or VM. -
Copy the
libandhoneypotMonitormodules into thesrcfolder.
Step2: Change the application configuration file
-
Rename the
src/honeypotMonitor/config_template.txttosrc/honeypotMonitor/config.txt -
Change the
FLASK_SER_PORT:5000if you need to set another port for the monitor web (such as 8080).
Step3: Run the Monitor Hub program
-
Navigate(cd) to the
honeypotMonitorfolder and run the monitor hub program with commandsudo python3 monitorApp.py. -
In the orchestration network open a browser and visit URL http://172.23.20.4:5000 to verify that the monitor hub is online, as shown below:
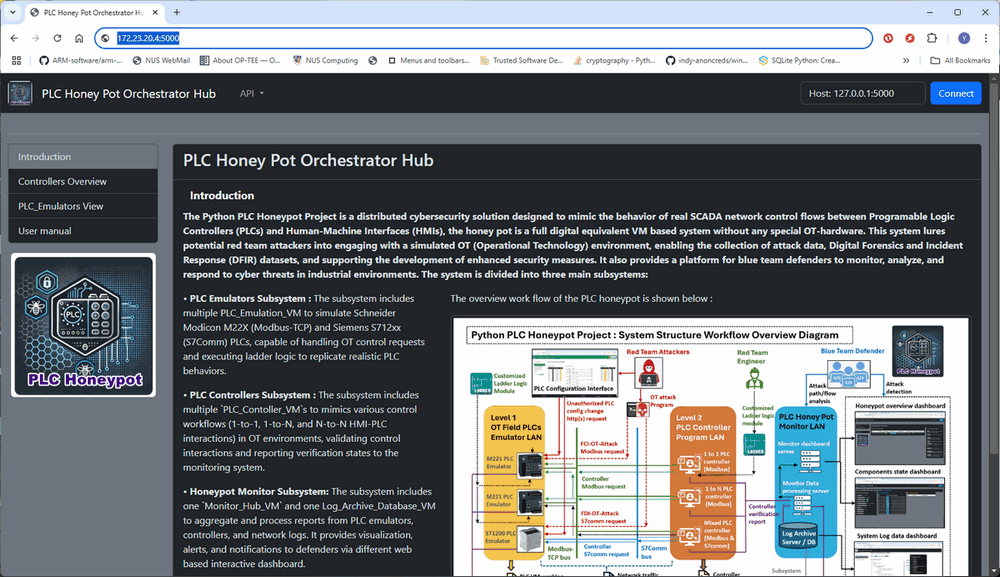
Figure-02: Honeypot deployment: Monitor Hub Landing Page, version v_0.1.3 (2024)
Deploy Honeypot Log Archive VM
Step 1: Setup the program
-
-
Create a directory structure:
logServer/srcin the machine or VM. -
Copy the
libandhoneypotLogServermodules into thesrcfolder.
Step 2: Configure the application
-
Rename the configuration files as follows :
src/honeypotLogServer/ServerConfig_template.txt→src/honeypotLogServer/ServerConfig.txtandsrc/honeypotLogServer/userRecord_template.json→src/honeypotLogServer/userRecord.json -
Update the agent's credentials in
userRecord.jsonby adding the login password:
"agent": {
    "passwd": "123456",
    "perm": "elradfmwM"
}
-
Modify the configuration file
ServerConfig.txtto disable test mode by changing the following line:
...
line06: # Web test mode flag: True start without init the FTP server
line07: TEST_MODE:False
...
Step 3: Run the Log Archive Program
-
Navigate to the
honeypotLogServerfolder and run the log archive server application with commandsudo python3 logArchiveServerApp.py -
In the orchestration network open a browser visit to verify that the log archive server is online, as shown below:
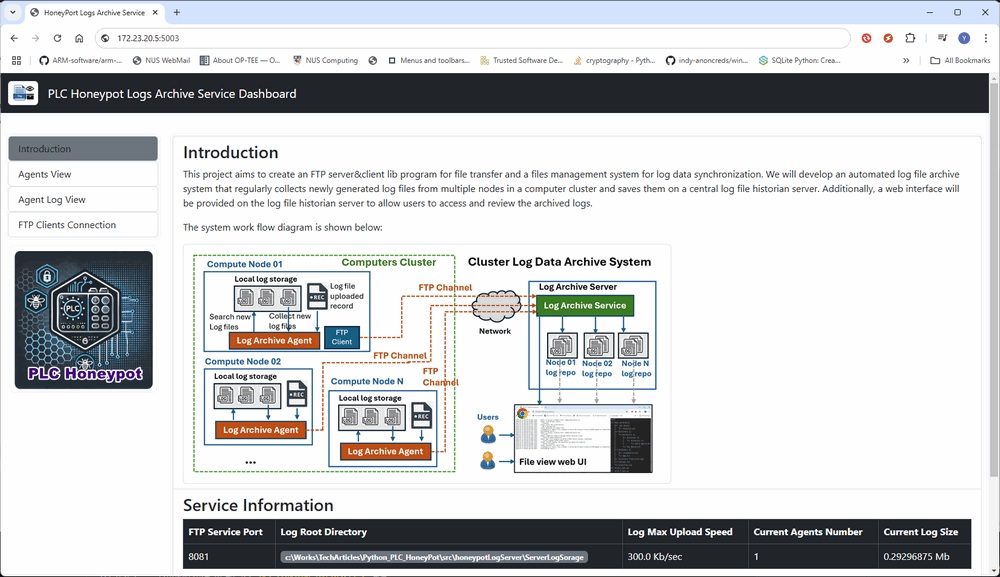
Figure-03: Honeypot deployment: Log Archive Server Landing Page, version v_0.1.3 (2024)
Deploy Modbus PLC Emulator VM
Step 1: Setup the program
-
Follow the program setup instructions to install the required libraries.
-
Create a directory structure:
plcEmulator/src. -
Copy the following modules into the
srcfolder:lib,honeypotLogClient, andmodbusPlcEmulator.
Step 2: Configure and Deploy the Log Archive Client Program
-
Rename the file
src/honeypotLogClient/AgentConfig_template.txttosrc/honeypotLogClient/AgentConfig.txt. -
Edit the
AgentConfig.txtfile and configure the following parameters:PLC ID,IP address,Log server IP,Log folder nameas shown below:
#-----------------------------------------------------------------------------
# Unique Agent ID, all the log file will be saved in the server's home// folder
AGENT_ID:modbusPLC01
AGENT_IP:172.23.155.209
#-----------------------------------------------------------------------------
# FTP server info and login credentials, don't upload the credentials to the Github
FTP_SER_IP:172.23.20.5
FTP_SER_PORT:8081
USER_NAME:agent
USER_PWD:P@ssw0rd
...
#-----------------------------------------------------------------------------
# local folder save the log files.
LOG_DIR:../Logs
...
-
Run the log archive client program with command
python3 logArchiveAgent.py -
Open the archive server's web agent list page (Agents View tag) to check whether the log archive agent has registered and connected successfully:

Figure-04: Honeypot deployment: Confirm PLC registered in Log archive server, version v_0.1.3 (2024)
Step 3: Configure and Deploy the PLC Emulator Program
-
Rename the file
src/modbusPlcEmulator/config_template.txttosrc/modbusPlcEmulator/config.txt. -
Edit the
PLC ID,IP address, addcontroller's IP addressin allow read and write list, editmonitor hub IP addressandportas shown below:
# This is the config file template for the PLC honeypot project's Modbus PLC
# emulator program
# Setup the parameter with below format (every line follows : format, the
# key can not be changed):
#-----------------------------------------------------------------------------
# OwnID should not include space or other special characters.
Own_ID:modbusPLC01
Own_IP:172.23.155.209
# The OT protocol type string, "Modbus" or "S7Comm".
PRO_TYPE:Modbus
# The ladder logic file id used by this PLC emulator.
LADDER_ID:mbLadderLogic.py
#-----------------------------------------------------------------------------
# Define the ip addresses allowed to read PLC state:
# json list format: ["masterIP", "slave1IP", ...]
ALLOW_R_L:["172.23.155.206"]
# Define the ip addresses allowed to change PLC state:
# json list format: ["masterIP", "slave1IP", ...]
ALLOW_W_L:["172.23.155.206"]
#-----------------------------------------------------------------------------
# define the monitor hub parameters :
MON_IP:172.23.20.4
MON_PORT:5000
# Time interval to report to the monitor hub in seconds:
RPT_INTERVAL:5
#-----------------------------------------------------------------------------
# Init the PLC local web Flask app parameters
FLASK_SER_PORT:5001
FLASK_DEBUG_MD:False
FLASK_MULTI_TH:True
# The PLC local web  use credential record file
USERS_RCD:users.json
-
src/modbusPlcEmulator/users_template.jsontosrc/modbusPlcEmulator/users.json. -
Run the Modbus PLC emulator program with command
sudo python3 modbusPlcApp.py -
Open a browser in the honeypot network and visit
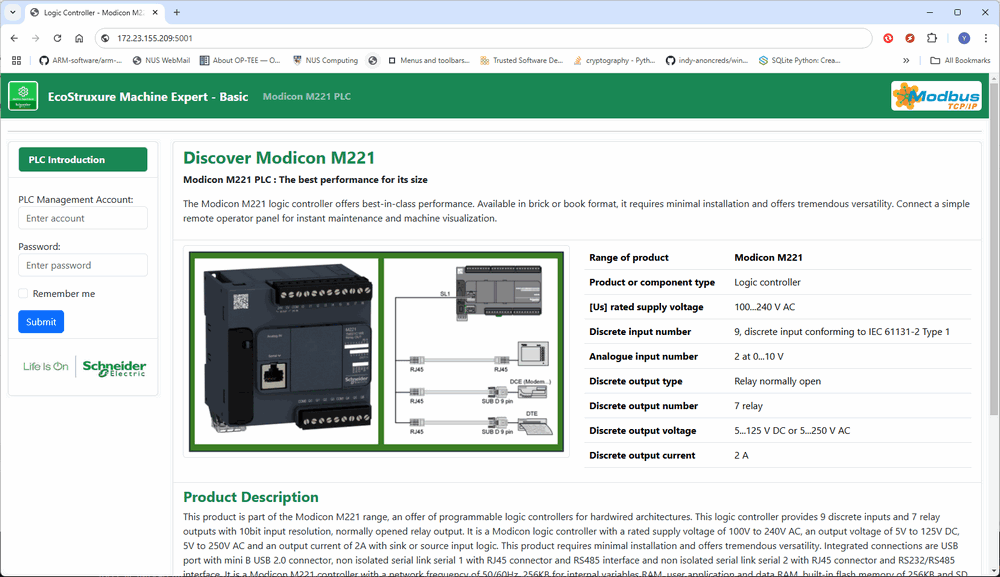
Figure-05: Honeypot deployment: Confirm PLC emulator config page assessable, version v_0.1.3 (2024)
- Then access the monitor hub through the orchestration network and confirm that the PLC emulator has registered successfully, as shown below:

Figure-06: Honeypot deployment: Confirm PLC emulator config page assessable, version v_0.1.3 (2024)
Deploy Modbus PLC Controller VM
Step 1: Set Up the Program
-
Follow the program setup instructions in readme file to install the required libraries.
-
Create the directory structure:
plcController/src. -
Copy the following modules into the
srcfolder:lib,honeypotLogClient, andmodbusPlcController.
Step 2: Configure and Deploy the Log Archive Client Program
-
Rename the file
src/honeypotLogClient/AgentConfig_template.txttosrc/honeypotLogClient/AgentConfig.txt. -
AgentConfig.txtfile to include the following details:PLC ID,IP address,Log server IP,Log folder nameas shown below:
#-----------------------------------------------------------------------------
# Unique Agent ID, all the log file will be saved in the server's home// folder
AGENT_ID:Controller01
AGENT_IP:172.23.155.206
#-----------------------------------------------------------------------------
# FTP server info and login credentials, don't upload the credentials to the Github
FTP_SER_IP:172.23.20.5
FTP_SER_PORT:8081
USER_NAME:agent
USER_PWD:P@ssw0rd
...
#-----------------------------------------------------------------------------
# local folder save the log files.
LOG_DIR:../Logs-
python3 logArchiveAgent.py -
Figure-07: Honeypot deployment: Confirm PLC controller registered in the Log Archive server, version v_0.1.3 (2024)
-
Rename the
src/modbusPlcController/config_template.txttosrc/modbusPlcController/config.txt, -
Edit the Controller ID, IP address, target PLC ID, IP, port monitor hub IP address and port as shown below:
# This is the config file template for the  the PLC honeypot project's Modbus PLC
# controller program
# Setup the parameter with below format (every line follows : format, the
# key can not be changed):
#-----------------------------------------------------------------------------
OWN_ID:Controller01
OWN_IP:172.23.155.206
# The OT protocol type string, "Modbus" or "S7Comm".
PRO_TYPE:Modbus
# The ladder logic file id used by this PLC controller.
LADDER_ID:mbLadderLogic.py
#-----------------------------------------------------------------------------
# The PLC ID and IP address, the ID must be same as the
PLC_ID:modbusPLC01
PLC_IP:172.23.155.209
PLC_PORT:502
# PLC data fetch time interval (sec)
PLC_CINT:10
#-----------------------------------------------------------------------------
# define the monitor hub parameters :
MON_IP:172.23.20.4
MON_PORT:5000
# Time interval to report to the monitor hub in seconds:
RPT_INTERVAL:5
-
sudo python3 mbPlcControllerApp.py -
Figure-08: Honeypot deployment: Confirm PLC controller registered on the Monitor Hub, version v_0.1.3 (2024)
Deploy S7Comm PLC Emulator VM
Step 1: Set Up the Program
-
Follow the program setup section to install the required libraries.
-
plcEmulator/src. -
Copy the following modules into the
srcfolder:lib,honeypotLogClients7commPlcEmulator
Step 2: Configure and Deploy the Log Archive Client Program
Rename the file src/honeypotLogClient/AgentConfig_template.txt to src/honeypotLogClient/AgentConfig.txt.
-
Edit the
AgentConfig.txtfile with the following information: PLC ID, IP address, log server IP, log folder name as shown below:
#-----------------------------------------------------------------------------
# Unique Agent ID, all the log file will be saved in the server's home// folder
AGENT_ID:S7commPLC02
AGENT_IP:172.23.155.208
#-----------------------------------------------------------------------------
# FTP server info and login credentials, don't upload the credentials to the Github
FTP_SER_IP:172.23.20.5
FTP_SER_PORT:8081
USER_NAME:agent
USER_PWD:P@ssw0rd
...
#-----------------------------------------------------------------------------
# local folder save the log files.
LOG_DIR:../Logs
-
python3 logArchiveAgent.py -
Step 3: Configure and Deploy the PLC Emulator Program
-
Rename the file
src/s7CommPlcEmulator/config_template.txttosrc/s7CommPlcEmulator/config.txt. -
Edit the
config.txtfile with the following details: PLC ID, IP address, monitor hub IP address and port as shown below:
# This is the config file template for the PLC honeypot project's S7Comm PLC
# emulator program
# Setup the parameter with below format (every line follows : format, the
# key can not be changed):
#-----------------------------------------------------------------------------
# OwnID should not include space or other special characters.
Own_ID:S7commPLC02
Own_IP:172.23.155.208
# The OT protocol type string, "Modbus" or "S7Comm".
PRO_TYPE:S7Comm
# The ladder logic file id used by this PLC emulator.
LADDER_ID:s7LadderLogic.py
#-----------------------------------------------------------------------------
# define the monitor hub parameters :
MON_IP:172.23.20.4
MON_PORT:5000
# Time interval to report to the monitor hub in seconds:
RPT_INTERVAL:5
#-----------------------------------------------------------------------------
# Init the PLC local web Flask app parameters
FLASK_SER_PORT:5002
FLASK_DEBUG_MD:False
FLASK_MULTI_TH:True
# The PLC local web  use credential record file
USERS_RCD:users.json-
src/s7CommPlcEmulator/users_template.jsontosrc/s7CommPlcEmulator/users.json. -
Run the S7Comm PLC emulator program with command
sudo python3 s7commPlcApp.py. -
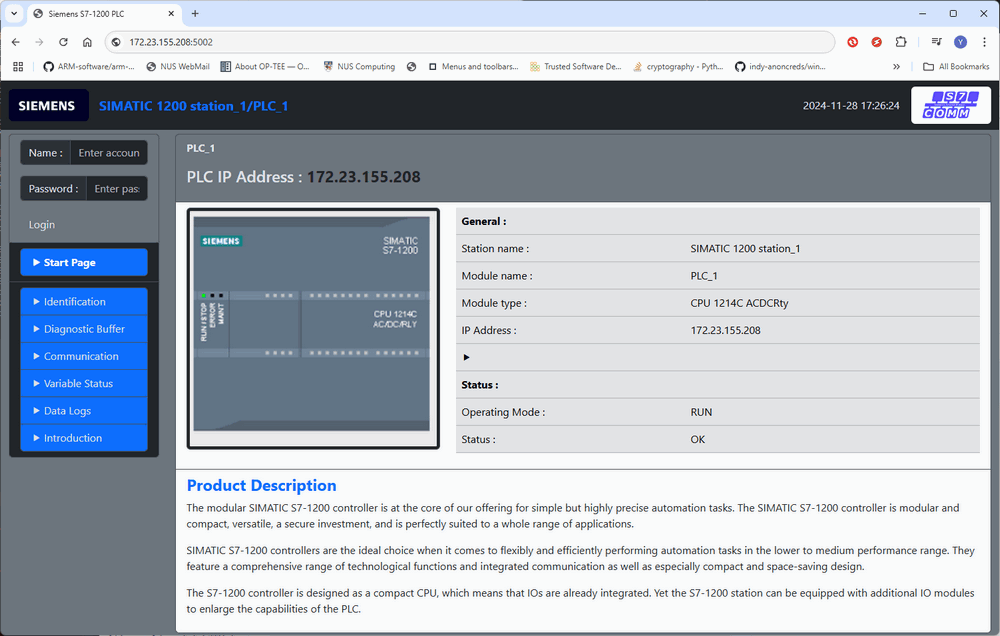
In the honeypot network, access the URL
http://172.23.155.208:5002
Deploy S7Comm PLC Controller VM
-
Follow the program setup section to install the required libraries.
-
Create the directory
plcController/src. -
Copy the following modules into the
srcfolder:lib,honeypotLogClient,s7commPlcController
Step 2: Configure and Deploy the Log Archive Client Program
-
Rename the file
src/honeypotLogClient/AgentConfig_template.txttosrc/honeypotLogClient/AgentConfig.txt. -
Edit the
AgentConfig.txtfile with the following details:PLC ID,IP address,log server IP,log folder nameas shown below :
#-----------------------------------------------------------------------------
# Unique Agent ID, all the log file will be saved in the server's home// folder
AGENT_ID:Controller02
AGENT_IP:172.23.155.206
#-----------------------------------------------------------------------------
# FTP server info and login credentials, don't upload the credentials to the Github
FTP_SER_IP:172.23.20.5
FTP_SER_PORT:8081
USER_NAME:agent
USER_PWD:P@ssw0rd
...
#-----------------------------------------------------------------------------
# local folder save the log files.
LOG_DIR:../Logs-
Run the log archive client program with command
python3 logArchiveAgent.py -
Verify the client registration on the archive server, similar to the Modbus PLC Controller VM configuration.
Step 3: Configure and Deploy the PLC Controller Program
-
src/s7CommPlcController/config_template.txttosrc/s7CommPlcController/config.txt. -
Edit the
config.txtfile with the following configurations: PLC ID, IP address, monitor hub IP address and port as shown below:
# This is the config file template for the  the PLC honeypot project's Modbus PLC
# controller program
# Setup the parameter with below format (every line follows : format, the
# key can not be changed):
#-----------------------------------------------------------------------------
OWN_ID:Controller02
OWN_IP:172.23.155.207
# The OT protocol type string, "Modbus" or "S7Comm".
PRO_TYPE:S7Comm
# The ladder logic file id used by this PLC controller.
LADDER_ID:s7LadderLogic.py
#-----------------------------------------------------------------------------
# The PLC ID and IP address, the ID must be same as the
PLC_ID:S7commPLC02
PLC_IP:172.23.155.208
PLC_PORT:102
# PLC data fetch time interval (sec)
PLC_CINT:10
#-----------------------------------------------------------------------------
# define the monitor hub parameters :
MON_IP:172.23.20.4
MON_PORT:5000
# Time interval to report to the monitor hub in seconds:
RPT_INTERVAL:5
-
Run the controller program with the command:
sudo python3 s7commPlcControllerApp.py -
Verify that the controller is registered in the monitor hub through the orchestration network. This step is similar to the S7Comm PLC Emulator VM setup.
Both the emulator and controller require the same ladder logic module to ensure proper simulation and control. You can use the provided example files, src\s7commPlcEmulator\s7LadderLogic.py or src\modbusPlcEmulator\mbLadderLogic.py, as templates to create your custom ladder logic.
The ladder logic is implemented using Python, allowing you to simulate complex logic operations. For instance, the following example demonstrates an 8-rung ladder logic that processes the values of 8 input holding registers and updates 8 output coils accordingly.
Ladder logic diagram example:
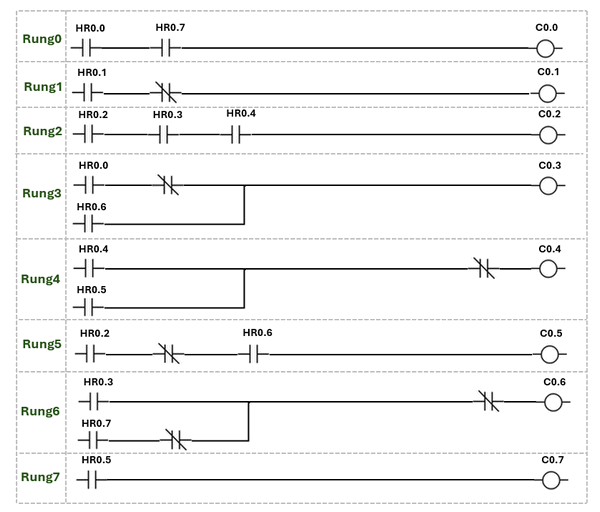
Figure-10: Honeypot deployment: Test ladder diagram, version v_0.1.3 (2024)
runLadderLogic()
    #-----------------------------------------------------------------------------
    def runLadderLogic(self, regsList, coilList=None):
        """ Execute the ladder logic with the input holding register list and set
            the output coils. In this example, there will be 8 rungs to be executed.
        """
        # coils will be set ast the reverse state of the input registers' state.
        if len(regsList) != 8: return None
        # rung 0: HR0 and HR2 -> Q0
        c0 = regsList[0] and regsList[7]
        # rung 1: not HR1 -> Q1
        c1 = not regsList[1]
        # rung 2: HR2 and HR3 and HR4 -> Q2
        c2 = regsList[2] and regsList[3] and regsList[4]
        # rung 3: not HR0 or HR6 -> Q3
        c3 = (not regsList[0]) or regsList[6]
        # rung 4: not (HR4 or HR5) -> Q4
        c4 = not (regsList[4] or regsList[5])
        # rung 5: (not HR0) and HR6 -> Q5
        c5 = (not regsList[0]) and regsList[6]
        # rung 6: HR3 or (not HR7) -> Q6
        c6 = regsList[3] or (not regsList[7])
        # rung 7: HR5 -> Q7
        c7 = regsList[5]
return [c0, c1, c2, c3, c4, c5, c6, c7]runLadderLogic()
Attack Detection Case Study
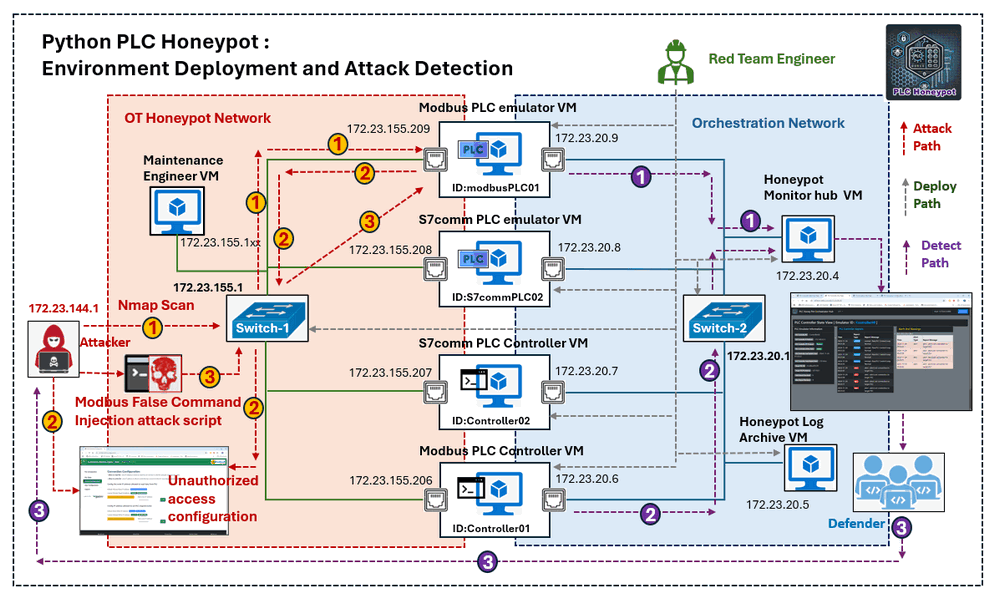
This case study demonstrates how to detect and respond to a Modbus-TCP False Command Injection Attack using the deployed honeypot system (introduced in the previous section). For details on attack alerts and notifications, refer to the Alert and Notification section in the README file.
In this scenario, an attacker attempts to compromise the target PLC in three key steps:
-
Identify the Target: Use
Nmapto scan the network, identify the PLC, and discover open ports. -
Modify Access Permissions: Attempt to read or write data to the PLC and access its configuration page to alter access permissions.
-
Execute the Attack: Launch a False Command Injection attack to manipulate PLC coil data by injecting incorrect commands.
The defender detects the attack path and uses the monitor hub’s reports to identify and respond to the attack. The diagram below illustrates the design of the attack scenario with the red team attack path and the blue team detection path:
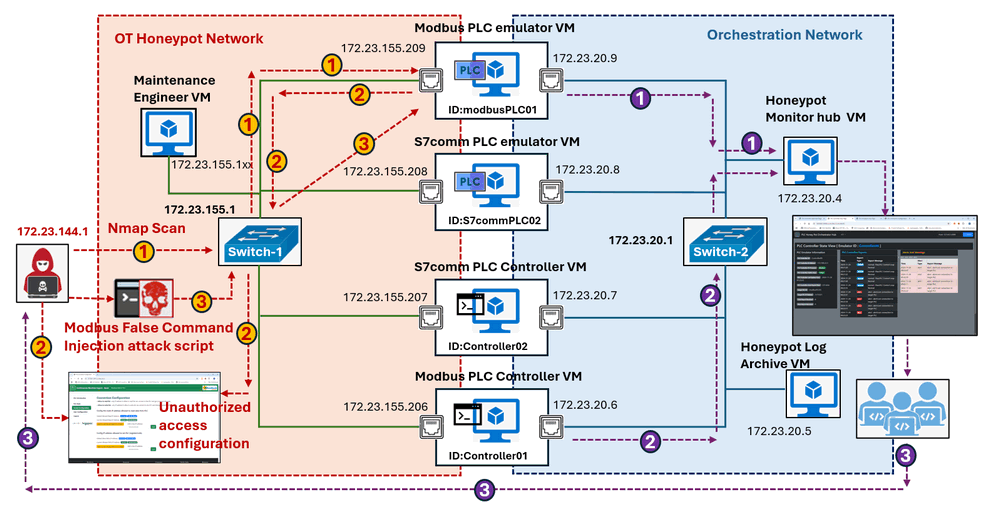
Figure-11: Honeypot Attack Detection: attack Path and detection path , version v_0.1.3 (2024)
Attack Step 1: PLC Scanning and Command Attempt
The attacker initiates an Nmap scan to probe the target Modbus PLC's IP address(172.23.155.209) , as shown below:
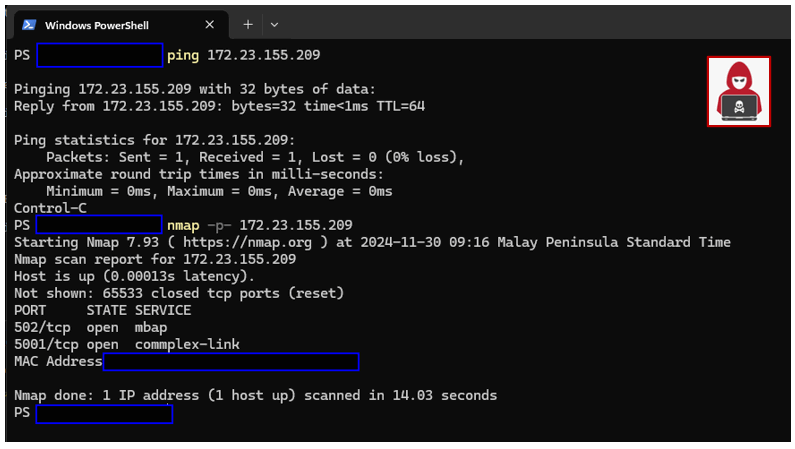
Figure-12: Honeypot Attack Detection: attacker nmap scan result, version v_0.1.3 (2024)
From the scan, the attacker identifies 2 open ports:
-
TCP Port 502: Associated with the
mbapservice, indicating a Modbus-TCP server potentially running on a PLC device. -
TCP Port 5001: Associated with the
commplex-linkservice, possibly hosting an HTTP(S) server.
The attacker performs the following actions:
-
Sends
curlrequests tohttp://172.23.155.209:5001andhttps://172.23.155.209:5001to verify the HTTP service response. -
Creates a simple Modbus Read/Write client script to test read and write operations on the PLC:


